A Guide to Mastering the Key Library Requirements to Make the Most Out of Using Harness Builder for E3.series
Harness Builder for E3.series is an innovative software solution designed to streamline and optimize the intricate process of harness design and manufacturing. Offering a comprehensive suite of tools for detailed design creation, it enables engineers to construct precise and efficient wire harnesses. Harness Builder empowers teams to deliver high-quality harnesses that meet stringent industry standards and customer specifications. This is achieved by facilitating everything from the initial design phase to the final manufacturing step. This powerful tool simplifies complex tasks and ensures that harnesses are functional, cost-effective, and reliable, making it an essential asset in modern electrical engineering workflows.
A well-organized and accurate library is the backbone of harness design efficiency in E3.series. It acts as the central repository for all component data, ensuring that designers have immediate access to correct and standardized parts information. This organization is crucial for avoiding costly errors and rework, speeding up the design process, and ensuring consistency across multiple projects. A well-set library streamlines the selection and placement of parts, which is vital for meeting project deadlines and quality standards. In essence, an optimized library is key to a smooth design workflow and a robust foundation for the manufacture of reliable and high-performing harnesses. In this post, we will review these different library requirements.
Essential Library Requirements to Consider
It is vital to accurately add attribute information and symbol text to components and symbols to ensure that Harness Builder features and outputs function optimally. This information allows designers and downstream processes to maximize the tool’s potential. Companies can easily add these attributes and text types to their libraries using the scripts we provide with Harness Builder. There are some key library requirements for Harness Builder functionality to remember. These requirements apply when creating components and symbols, in addition to custom attributes and attributes used for filtering the library.
Performing a Cost Analysis
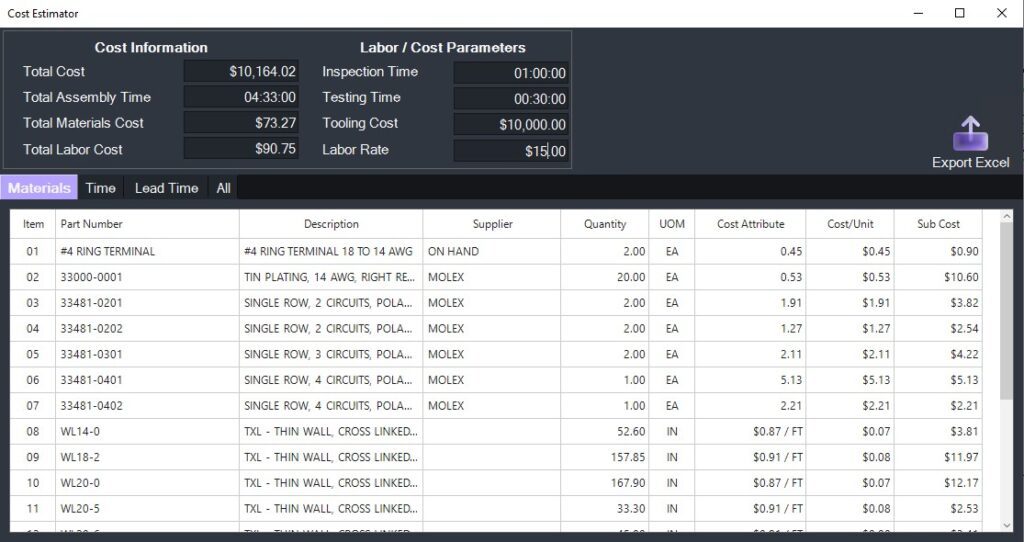
The Harness Builder Cost Estimator calculates and summarizes the cost details of the wire harness. Companies can export the cost details as an Excel file for further analysis and sharing. Librarians must add these three key library requirements to library components to populate the values for the cost and labor estimates.
- Cost/Cost (extended)– The attribute “Cost” defines the unit price for the component. Additionally, the Cost Estimator recognizes the “Cost (extended)” attribute and creates a cost estimate based on vendor price breaks. Examples can be found in the Harness Builder Help file for the different value formats of these attributes. These examples include defining cost per unit, package, and length.
- Assembly Time– This attribute provides the time allocated to the assembly of one unit, which the Cost Estimator utilizes in the labor time estimates.
- Lead Time– The attribute “Lead Time” details the time for parts acquisition, tooling setup and tear-down, and delivery. The report adds this time to the Sub Assembly Time.
Running a Weight Analysis
The Harness Builder Harness Weight estimation tool calculates the weight of a harness and produces a summary of weight details. Furthermore, users can export this report as an Excel file. For this report, librarians must add the “Weight” attribute to components.
- Weight– The attribute “Weight” is added to describe the part’s weight per unit or length. There are two types of weight units: weight and linear density. Weight units apply to piece parts such as connectors, backshells, pins, and terminals. Linear Density units apply to components like cables, wires, tubes, and overbraids. The weight units that Harness Builder recognizes are available in the Help file.
Adding Accessories to Devices
The Additional Parts feature is available in Harness Builder and allows you to include device accessories. For instance, you can add wedge locks, backshells, dust caps, mounting accessories, and heat shields to connectors. The bill of materials (BOM) contains the device component and the associated additional parts.
- Component Group– The librarian assigns the attribute “Component Group” and the same value to any related components or accessory parts as a prerequisite to using the Additional Parts feature. After selecting a device, the Additional Parts tab provides a list of all elements within the database defined as an accessory to a selected device. The list will only show elements that have the same value for the “Component Group” attribute. An example would be the Deutsch DT04-4P connector. The connector and any related accessories would have the “Component Group” attribute value set to something like “DT04-4P.”
Harness Builder’s Built-in Length Calculations
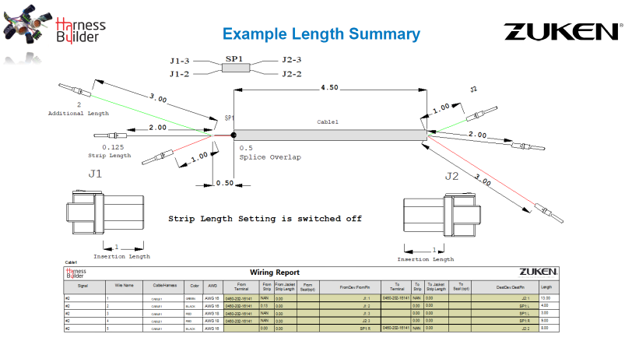
Harness Builder leverages wire lengths in the BOM quantities, the wire run list (WRL) lengths, and for exports to wire processing machines. Calculating wire lengths is vital to capturing accurate reports and sending cut-length information to the manufacturing floor. Moreover, precise wire cut lengths prevent excess wire scraps or cutting wires too short. Librarians can apply four additional key library requirements to components that impact the overall wire/cable lengths.
- Splice Overlap– This attribute adds the additional length required to splice wires together, typically applied for ultrasonic welded splices. This additional length is where the two or more wires would overlap to create the weld, hence the name. Librarians will add the “Splice Overlap” attribute to splice components in the library. In addition to calculating wire length, Harness Builder also leverages the splice overlap length when calculating the length for splice heat shrinks.
- Insertion Length– The “Insertion Length” attribute value is the measurement inside the cavity connecting to the wire. This length is added to the calculation since the calculations for the main segment lengths are to the back of the connector/device. However, the wire does not end at this point. We need to capture the length from the back of the connector to where the wire ends inside. Librarians will add this attribute to components like connectors or ring terminals in the library.
- Strip Length– Including the “Strip Length” attribute is optional for wire length calculations. Additionally, the attribute can be leveraged with wire processing machines to define the wire’s strip length requirements. The librarian will add this attribute to contacts or connector pin terminals in the library.
- Tolerance– Adding tolerance is another optional additional length calculation possibility. The librarian can set up the sheet symbols in the library with multiple instances of the “Tolerance” attribute. The value of this attribute is set to define different tolerance cases. For example, if the length is 1 to 5 feet, add 2 inches, or 5 to 10 feet, add 4 inches. Based on these cases, the calculations add this additional tolerance to the wire lengths.
Including Splice Manufacturing Documentation
Splices are an integral part of wire harness designs. In E3.series, designers add splices using a splice component. These components can represent different types of splices like ultrasonic welded or butt splices. Harness Builder has built-in features that help place splice manufacturing documentation and select the correct size heat shrink to go over the splice. There are three attributes librarians will need to remember when creating splice components.
- Splice Length– The librarian will add this attribute to detail the overall length of a splice. Typically, they will add this attribute to butt splices or splice connectors that have a set value for the length. The “Splice Length” attribute ensures that the splice heat shrink placed with the Harness Builder command is set to the correct length. This length is required to cover the splice.
- Splice Outer Diameter– This is another attribute that librarians typically add to butt splice connectors to assist with sizing the heat shrink correctly. Harness Builder will read this value when determining the list of valid heat shrink to apply to a splice in the project.
- Splice Overlap– We mentioned using this attribute above in the length section. The librarian will include this attribute on the splice component to be available for the length calculations.
Automatic Heat Shrink Selection
In addition to adding heat shrink to splices, as mentioned above, heat shrink can be used for wire labels, applying to ring terminals, and more. Harness Builder uses four attributes when determining what heatshrinks are valid for splices and wire labels and the cut lengths required.
- Heat Shrink Diameter– The “Heat Shrink Diameter” attribute allows designers to filter and select heat shrink based on size. Just as the name suggests, the librarian would set the value to the diameter of the heat shrink component.
- Heat Shrink Longitudinal Shrinkage– Heat shrink tubing has a slight loss of length during the application process or after shrinking. Harness Builder considers this lost length when calculating the length to order for the splice heat shrink. Librarians must add this shrinkage percentage to the attribute’s value of the heat shrink components in the library for the tool to consider it in the calculations.
- Heat Shrink Post-Recovery ID and Heat Shrink Pre-Recovery ID – Harness Builder will use these two attributes when presenting the list of valid heat shrinks based on diameter with splices and wire labels. The diameter of the splice or wire must fall within this diameter range. Being the backbone of the selection process makes these attributes critical for librarians to remember when creating heat shrink components.
Automatically Select Cable Protection
- Tube Diameter– Selecting and applying cable protection is necessary for wire harness designs. Harness Builder for E3.series can automatically select and place appropriate-sized protections on the harness segments. First, this automatic selection uses the built-in segment diameter calculations that E3.series performs. Then, it parses through the library components for the correct size component using the “Tube Diameter” attribute of the selected type of covering. Additionally, users can define a percentage fill limit to prevent overstuffing the cable protection. The tool considers this percentage in the selection process. For this feature to work, librarians must add the attribute and value to the cable protection components in the library.
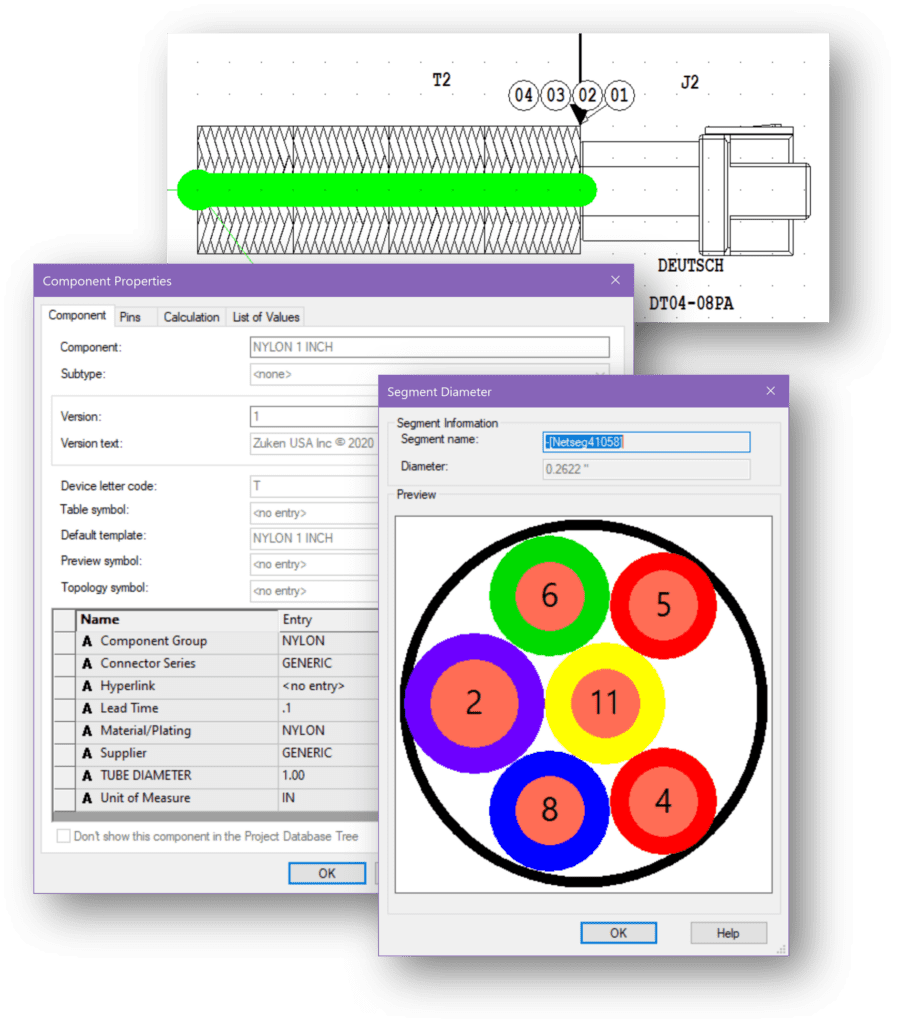
Defining Unit of Measure (UOM)
- UOM– Harness Builder’s use of the “UOM” attribute is universal and referenced in many areas. The common uses are for the BOM, the cost, and weight analysis reports to detail the unit for the quantity of the components. The “UOM” attribute has an associated attribute list with the valid unit options that librarians can add to the library’s components.
Part Exclusion for Bill of Materials
- NoBOM– The “NoBOM” attribute is not specific to Harness Builder; other BOM reports in E3.series will also use this attribute. When users add this attribute to components in the library or a device in the project. An example of a library component a librarian may add this attribute to is an ultrasonic welded splice component. Since this type of splice typically does not need to be on the parts list for ordering.
Customizing On-Sheet BOM and WRL Report Symbols
A prominent feature of Harness Builder is allowing users to place on-sheet table symbols for the bill of materials and wire run lists. These symbols have key library requirements, such as unique attributes and texts to display the report information. The Harness Builder Help file is a great resource to find a list of all the attributes and texts related to these symbols. One tip to highlight when creating custom attributes for the BOM symbol is to ensure that Symbol is an owner of the attribute.
Using Wire Colors on Connector Insertion View Symbols and Formboard Connector Tables
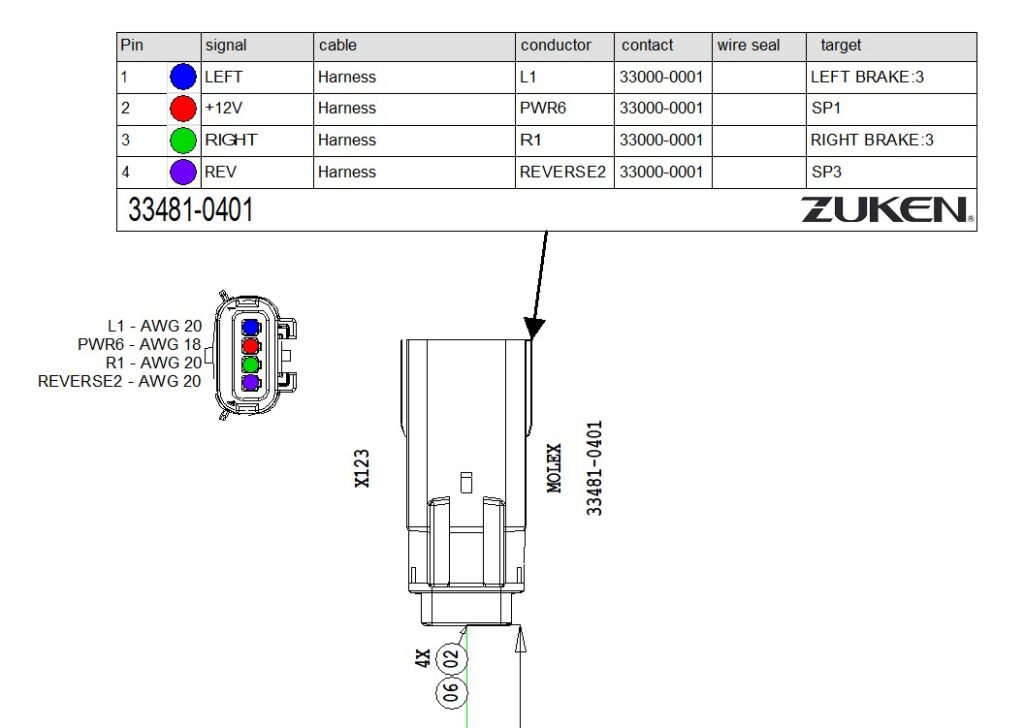
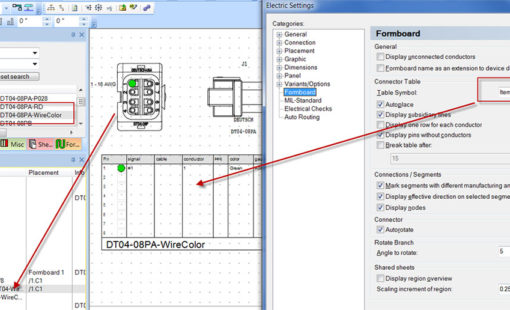
Another valuable feature of Harness Builder is the ability to display the wire colors connected to connector pins on the formboard connector tables. Additionally, wire colors are also displayed on the insertion view symbol of the connector. There are two text types for displaying this wire information.
- Wire Position– Harness Builder uses the “Wire Position” text type to display the wire color on these symbols. Therefore, when creating these symbols in the library, the librarian will use this text type as the placeholder for where the color is populated. When adding this text to the insertion view symbols, it is essential to place the instances of the text type in the order of the pins.
- Wire Information– Traditionally, added to the insertion view symbols, the “Wire Information” text type displays additional information about the connected wire. Users can customize this text string using the Wire Table setting in Harness Builder and define the parameters for the string.
Utilizing the Datasheet Viewer
- Hyperlink– The Datasheet Viewer window displays manufacturer datasheet content for selected items. The ability to view this datasheet while working on the project makes it quick and easy for a designer to look up the required information. Furthermore, users can save, print, zoom in or out, and toggle the Adobe Acrobat toolbar for additional PDF features in this window. Librarians can define the related datasheets to the component by adding instances of the “Hyperlink” attribute with the value set to the location of the stored datasheets.
Tips for Optimizing the Library for Harness Builder
Looking through the above list of key library requirements for Harness Builder may seem challenging to remember. With practice, adding these items will be second nature to the librarian, just as adding other attributes to the components. However, a company should define and follow a part creation process for successfully managing a library at a large scale. This definition might include a document or internal “Wiki” page describing all requirements for different components and symbols.
Having a process in place is excellent for creating new parts, but for customers looking to update existing parts in their libraries, there are tools available to help. First, inside the E3.series Database Editor is the Component Table. This table allows users to adjust attributes in their component library quickly. Using this table and the ability to paste Excel cell values directly is a great way to make bulk attribute changes. Another option for mass part creation and editing is using the E3.DBUpdate tool. This tool offers a more controlled method of loading mass database changes. Unlike the Component Table, which saves the changes to the component immediately after being modified in the table.
Summary and Takeaways
In conclusion, mastering the key library requirements is vital for wire harness design efficiency in E3.series. A well-organized and accurate library ensures that designers have immediate access to correct and standardized parts information. This streamlines the selection and placement of parts and ensures consistency across multiple projects. Teams can optimize their harness design workflow by accurately adding attribute information and symbol text. They can analyze cost and weight and leverage Harness Builder’s built-in length calculations. Additionally, they can add accessories to devices to manufacture high-quality, reliable, cost-effective harnesses. Making it possible for these harnesses to meet stringent industry standards and customer specifications.
Related Products and Resources
- Webinar
- Products

- Products
E3.series is a Windows-based, scalable, easy-to-learn system for the design of wiring and control systems, hydraulics and pneumatics. The out-of-the-box solution includes schematic (for circuit and fluid diagrams), cable (for advanced electrical and fluid design), panel (for cabinet and panel layout), and formboard (for 1:1 wiring harness manufacturing drawings). Integrated with MCAD, E3.series is a complete design engineering solution from concept through physical realization and manufacturing output.


