
Making Sense of Wire Groups in E3.series
E3.series Wire Groups Made Simple
If you’ve ever felt overwhelmed trying to organize wires in your E3.series library, you’re not alone. In this post, we’ll demystify E3.series Wire Groups, share common pitfalls to avoid, and offer practical tips for setting up part numbers. Whether you’re a seasoned user or just starting, this guide will help you streamline your workflow.
What’s an E3.series Wire Group, Anyway?
Think of a wire group in E3.series as a “family” component that groups wires together by common physical properties or traits. The intent is to help simplify searching for wires within the E3.series database. Instead of sifting through a massive list, you search for a wire group and then select the specific wire (or “wire type”) you need.
The E3.series component library has many wire groups, with the wire types grouped by insulation type, the most common being automotive PVC.
Fun fact: While the E3.series Help doesn’t call a collection of wires anything but wires, I call them wire types. The reason is that there is an E3 COM method called GetWireType() used to identify whether a wire belongs to a cable from the library or to a wire group.
Wire types will have three base physical properties: color, wire size, and outer diameter. Along with physical properties, they can also have additional attributes.
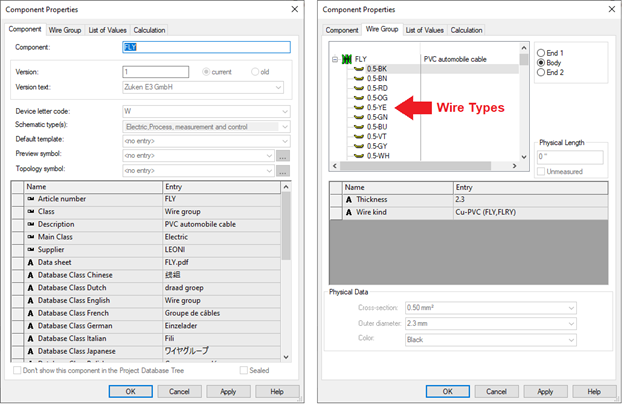
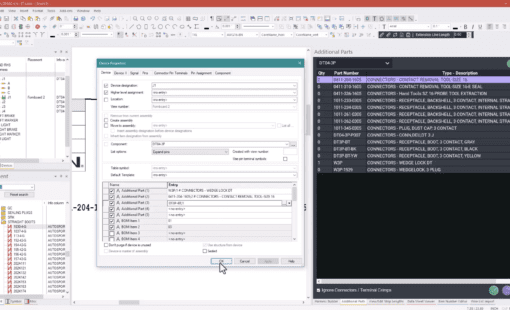
In the above image, the Wire Group tab shows a tree of wire types. The FLY group has a common wire size of 0.5mm2. Each wire type is 0.5mm2, but they are different colors.
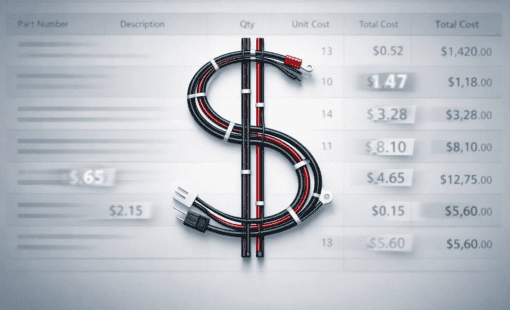
The Part Number Puzzle
If you’ve run an E3.series Bill of Materials (BOM) report, you’ve probably noticed that E3.series automatically generates wire part numbers by concatenating the group and type names. While this works for some, it’s rarely the ideal approach for all organizations.
So, What’s the Best Way to Assign Part Numbers?
The E3.series Help documentation doesn’t explain the best practices for creating wire groups. The way that we’ve frequently defined wire types within a group is just a sequential number.
As a rule, users must uniquely name each wire within the group. Otherwise, E3.series will not permit saving the wire group.
If I could go back in time, I would argue for using the wire type’s name as the wire’s part number. Unfortunately, this causes problems for reports. The reports would have to be updated to handle retrieving the wire part number from the wire type. This also means that every wire in the E3.series library would need to be updated, and the impact on existing drawings would be significant.
All that being said, here are the best options for assigning part numbers to your wires.
- Use the Wire Type Name
The ideal approach is to set the wire type name to match the manufacturer’s part number. This keeps things simple but might require updating reports to pull part numbers directly.
- Add a Part Number Attribute
Attach a dedicated Wire Part Number attribute to each wire type. This approach is flexible and allows for customization without altering the name. However, existing reports would need to search for the attribute of the wire part number on a wire.
- Do Both
Belt and suspenders! Use the wire type name for quick reference and an attribute for added detail.
No matter your choice, consistency is key. Just remember: sequential numbering (e.g., 1, 2, 3) or signal names might seem tempting but they often create confusion down the road.
Best Practices for E3.series Wire Groups
To help you avoid headaches later, here are some tips to keep your library organized:
For Wire Groups:
- Group wires by insulation type or specification.
- Add attributes like Unit of Measure for clarity.
For Wire Types:
- Name each wire type using the manufacturer’s part number or use a wire part number attribute.
- Avoid vague or sequential names.
- Add attributes like Cost to track pricing information accurately.
Pro Tip: Even if wires in a group have identical costs, assign the cost as a wire type attribute for consistency—especially if you plan to write scripts.
Conclusion
Organizing your wire groups doesn’t have to be a mystery. By defining part numbers thoughtfully, whether through naming conventions or attributes—you can make your library more efficient and user-friendly.
Key takeaways:
- Create groups with similar wire specifications.
- Use manufacturer part numbers for wire type names or add attributes.
- Stay consistent to simplify scripts and reports.
Ready to optimize your library? Start small, and don’t hesitate to experiment with these tips. Your future self—and your designs—will thank you.

-
Software Developer

Bob is a talented software developer with more than 8 years of experience at Zuken USA and specializes in scripting for E3.series, a skill he has honed since 2010. Bob’s background includes hands-on work in industrial controls and building wire harnesses, transitioning from hardware to application development. Based in Minnesota, he enjoys spending sunny days cruising on a pontoon with his wife while vibing to Yacht Rock, paddleboarding, and hitting the slopes in winter. Beyond these adventures, his other interests include gold panning and amateur radio.
- Blog
- Blog
- Blog
- Blog
Related Products and Resources
- Blog
- Blog

- Blog

- Blog